
Chords + Lyrics | Need Your Love So Bad
Intro
| 6/8 A | A | A7 | A7 |
| D | D | D#dim7 | D#dim7 |
| A | F#m | Bm7 | E |
| A | D7 | A | E |
Verse 1
| A | A | A7 | A7 |
Need someone’s hand, to lead me through the night.
| D | D | D#dim7 | D#dim7 |
I need someone’s arms, to hold and squeeze me tight.
| A | F#m | Bm7 | E |
Now when the night begins, I’m at an end.
| A | D7 | A | E7 |
Because I need, your love so bad.
Verse 2
| A | A | A7 | A7 |
I need some lips, to feel next to mine.
| D | D | D#dim7 | D#dim7 |
I need someone to stand up, and tell me when I’m lyin’.
| A | F#m | Bm7 | E |
And when the lights are low, and it’s time to go.
| A | D7 | A | A7 |
That’s when I need, your love so bad.
Bridge
| D | D | D#dim7 | D#dim7 |
So why don’t you give it up, and bring it home to me.
| A | A7 | A | A7 |
Or write it on a piece of paper baby, so it can be read to me.
| B | B7 | B | B7 |
Tell me that you love me, and stop drivin’ me mad.
| E | F | E | E7 |
Ooh because I, I need your love so bad.
Verse 3
| A | A | A7 | A7 |
Need your soft voice, that talked to me at night.
| D | D | D#dim7 | D#dim7 |
I don’t want you to worry, baby. I know we can make everything alright.
| A | F#m | Bm7 | E |
Listen to my plea baby. Bring it to me.
| A | D7 | A | E7 |
Because I need, your love so bad.
Outro
| A | A | A7 | A7 |
| D | D | D#dim7 | D#dim7 |
| A | F#m | Bm7 | E7 |
| A | D7 | A | E7 |
Need Your Love So Bad Backing Track | Chord Analysis
Above, you’ll find backing tracks to use when learning Need Your Love So Bad. I’ve used stem separation to extract the guitar while keeping the drums, bass, keys, horns, and vocals intact.
After studying the chords and TAB, use my backing tracks to prepare for playing this tune with a band.
Chord Progression – What’s Going On?
Need Your Love So Bad, made famous by Fleetwood Mac and guitarist Peter Green, is played in 6/8 time and features a 16-bar blues built from two distinct chord progressions.
Verse
The first progression covers the intro, verses, and outro. It begins with the typical I – IV movement found in many blues songs.
Things then get interesting with a #IVdim7 chord, which leads us back to I. This is followed by a turnaround using I – VI – II – V. The final four bars return to a classic blues ending: I – IV – I – V.
| A (I) | A | A7 | A7 |
| D (IV) | D | D#dim7 (#IVdim7) | D#dim7 |
| A (I) | F#m (VI) | Bm7 (II) | E7 (V) |
| A (I) | D7 (IV) | A (I) | E7 (V) |
To get ideas for how to comp these chords (there’s no rhythm guitar on the original recording), check out my TAB further down this guitar lesson.
Bridge
The second progression is also 16 bars long but begins on chord IV and once again includes the #IVdim7. It then moves to four bars on chord I, followed by four bars on chord IIx — a rather unusual choice.
The final four bars resemble the progression used in The Thrill Is Gone, moving from V to bVIx and back to V. Although that song is in a minor key, the structure is strikingly similar, making the comparison worthwhile.
Here’s the full bridge progression:
| D (IV) | D | D#dim7 (#IVdim7) | D#dim7 |
| A (IV) | A7 | A | A7 |
| B (IIx) | B7 | B | B7 |
| E (V) | F (bVIx) | E | E7 |
In the playlist at the top of the lesson, you’ll find the original version by Little Willie John, the famous Peter Green rendition with Fleetwood Mac, a duet by Adele and Paul Weller, and a powerful version by Gary Moore.
Here’s a chord chart.
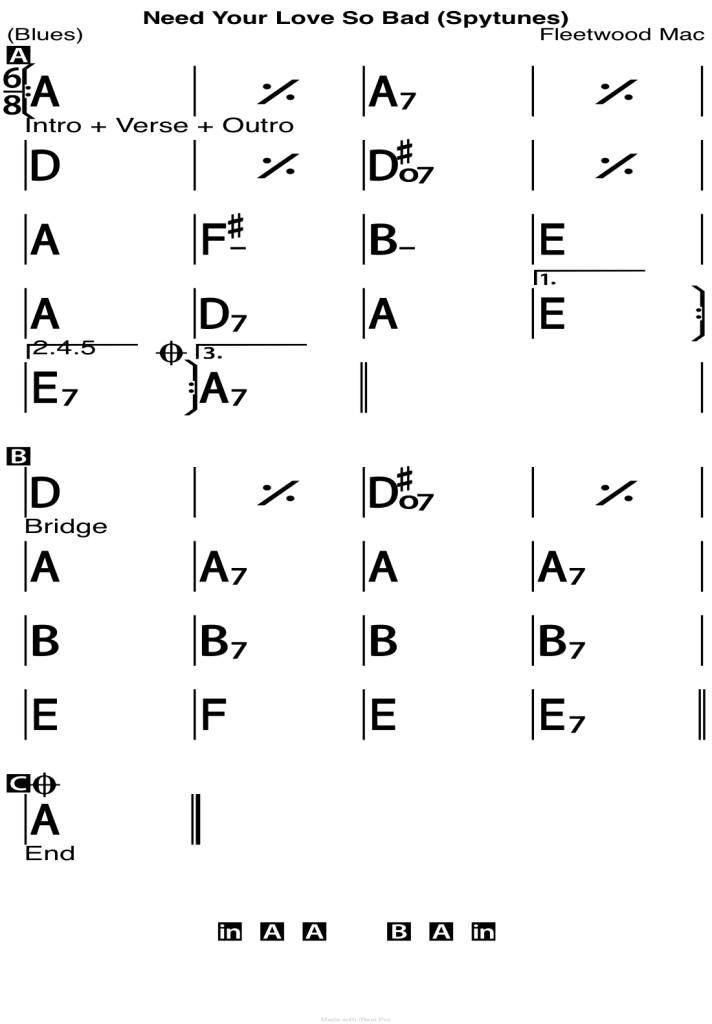
Need Your Love So Bad Chord Chart | PDF + iReal Pro Download
You can download my chord chart as a PDF or in iReal Pro format, which I highly recommend. The app allows you to easily change the key and even generate backing tracks in all keys, giving you the ability to practise soloing along with them.
The app is especially useful for jazz and jazz/blues progressions like this one. If you don’t use it, the chart is also available as a static PDF.
Need Your Love So Bad | TAB
Before we check out Peter Green’s amazing licks, let’s find a way to play a rhythm guitar part, as you probably won’t have a Hammond organ and string section on the gig.
Doing this also gets you familiar with the chord changes, which is important once we start soloing.
Intro + Verse 1 + Outro
Here’s a part that works well for the intro, verse 1, and the outro. Try it along with the backing tracks and see if you can improve it.

The main idea here is to avoid the root, then hold the chord for the second bar. Notice the A – F#m move — this will be recycled later.
Here’s verse 2 and 3. Now we comp on the beats, making a big strum, then switch to the higher strings when the snare hits.
Check out the A – D7 move — it’s almost the same as the F#m in the previous part. The note that would create the difference is simply left out.

Bridge
The bridge keeps the same comping idea from verses 2 and 3.

Solo
Here’s the intro solo. It’s very restrained, full of space, and packed with subtle detail. You could easily spend an hour playing this along with the original recording and on your own to the backing tracks, aiming to copy and replicate every nuance.

Let’s analyse what’s going on here:
- The first lick uses the A major pentatonic. The bend up, down, then up again must be very controlled.
- The second lick features a subtle hammer-on.
- Over the D chord, we can view the phrase as either A major pentatonic or D major pentatonic — the notes used here overlap.
- The D#dim7 chord gets an A minor pentatonic flavour blended with the major pentatonic.
- Over the A and F#m chords, we play just one note on each — the 3rd and the root. How you bend and phrase them is what matters most. The final two notes over F#m use the F# minor blues scale (b5 to 5).
- The Bm phrase outlines the b7 to root from a B minor pentatonic. As this is the turnaround, we clearly outline the changes.
- The E chord builds tension as we bend quickly towards the #5 of the chord. The intervals here are 9, 5, #5, and sus4 before resolving to the root of A.
- The final chord lick outlines the 3rd and 5th, then the 5th and b7 of D7. We then move chromatically towards the A chord, resolving on the 3rd and 5th. At the start, this phrase functions as the 6 and root of D before the chromatic movement begin.
Using what you’ve learned from mimicking Peter Green’s touch, memorising the intro solo, and studying the intervals, can you continue soloing in this style in an improvised way to the backing tracks?
The Legendary Peter Green and His Influence on Blues Guitar
Peter Green is one of the most revered U.K. blues guitarists, known for his incredible sense of timing, touch, tone, and phrasing — qualities that set him apart from many of his contemporaries.
His talent was so widely respected that B.B. King famously said: “He has the sweetest tone I’ve ever heard. He was the only one who gave me the cold sweats”.
Green’s reputation as a leading blues guitarist led to him being invited to join John Mayall’s band after Eric Clapton left.
It was a challenging experience. During early performances, fans would shout “We want God! We want God!”, referring to Clapton, who had already achieved near-mythical status among British blues fans.
After this period, Peter Green went on to form Fleetwood Mac, where he wrote and released iconic songs such as Black Magic Woman and Albatross, as well as recording a celebrated cover of Need Your Love So Bad by Little Willie John — the song we’re focusing on in this lesson.
To learn how to fret the chords and master those delicious Peter Green licks, check out the TAB lesson.
Need Your Love So Bad Chords: Continue learning
Step-by-step Guitar Courses

Master guitar by studying real tunes. Build your skills with video lessons, eBooks and practice routines that connect theory with the music you love!
Explore SpyTunes step-by-step Guitar Courses.
Five similar tunes | Chords + Lyrics


