
Chords + Lyrics | Killing In The Name (Drop D)
Intro
||: D5 :|| x4
||: D5 Eb5 (bass riff) :||
||: D5 Eb5 (Eb swell) :||
||: D5 Ebmaj(#9) :|| x8
||: D5 Eb5 :|| x4
| D5 Eb5 N.C (rit) |
Killing in the name of.
||: D7#9 (verse riff) F5 E5 :|| x4
Verse 1
||: D7#9 (muted verse riff) F5 E5 :|| x4
||: Some of those that work forces, are the same that burn crosses :|| x3
Some of those that work forces, you are the same that burn crosses.
Chorus A 1
| D13 D7b13 | D7 (F5 E5) D5 |
Ugh! Killing in the name of.
| D13 D7b13 | D7 C5 |
Killing in the name of.
Bridge 1
||: D5 :||
||: Now you do what they told ya :|| x4
||: D5 (w. mutes) :||
||: And now you do what they told ya :|| x4
||: D5 (w. mutes + noise) :||
||: But now you do what they told ya :|| x4
Chorus B 1
||: D5 F5 G5 A5 :||
Those who died are justified, for wearing the badge, they’re your chosen whites.
You justify those that died, by wearing the badge, they’re your chosen whites.
Those who died are justified, for wearing the badge, they’re your chosen whites.
You justify those who died, for wearing the badge, they’re your chosen whites.
Verse 2
||: Some of those that work forces, are the same that burn crosses :|| x3
Some of those that work forces, you are the same that burn crosses.
Chorus A 2
Ugh! Killing in the name of.
Killing in the name of.
Bridge 2
||: Now you do what they told ya :|| x4
And now you do what they told ya (Now you’re under control).
Now you do what they told ya (Now you’re under control).
||: And now you do what they told ya (Now you’re under control) :|| x6
Chorus B 2
Those who died are justified, for wearing the badge, they’re your chosen whites.
You justify those that died, by wearing the badge, they’re your chosen whites.
Those who died are justified, for wearing the badge, they’re your chosen whites.
You justify those who died, for wearing the badge, they’re your chosen whites.
Solo
||: D5 F5 G5 A5 :|| x8
Come on! Ugh! Yea! Come On! Ugh!
Outro
| D5 | E5 | F5 | G5 |
||: Fuck you, I won’t do what you tell me :|| x4
| A5 | Bb5 | C5 | D5 |
||: Fuck you, I won’t do what you tell me :|| x4
||: D5 F5 G5 A5 :||
||: Fuck you, I won’t do what you tell me :|| x8
End
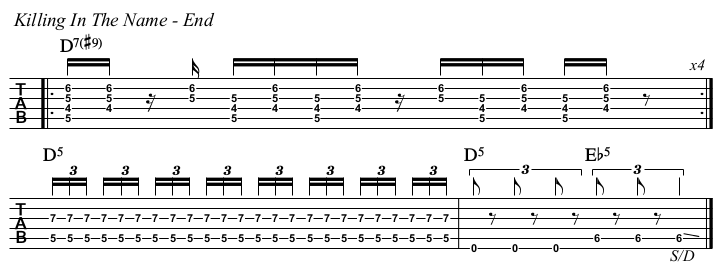
||: D7#9 :|| x4
Motherfucker, Ugh!
| D5 | D5 Eb5 |
Killing In The Name Backing Track | Chord Analysis
Above, you’ll find backing tracks to use when learning Killing In The Name. I’ve used stem separation to extract the guitar while keeping the drums, bass, and vocals intact.
After studying the chords and TAB, use my backing tracks to prepare for playing this tune with a band.
Chord Progression – What’s Going On?
Killing In The Name is not a music theory–friendly tune. Naming the chords here is a bit like dancing about architecture – let’s dance.
Intro
We begin with a D5, played in drop D tuning. You can strum from string 6, including string 5 (A is the 5th of D).
After four bars, pause and let the bass take over. Then bring in an Eb, using the volume knob to create a swell.
Next, we move into quarter-note triplets between D and Eb. This semitone movement from the root creates tension. Over the Eb, the guitar next outlines maj7 – root, #9 – 3rd, adding even more semitone friction.
If you combine these notes, you arrive at Ebmaj7(#9). However, as they’re not played simultaneously, it’s not truly a chord—just a helpful way to label the intervals involved.
After alternating between the roots of D and Eb, we move into the verse riff, played open rather than palm-muted as it will be later.
Verse
The verse riff is, again, a sequence of notes rather than a fixed chord. If you group the tones to understand the harmony, you get a D7#9, framed by two power chords—F5 and E5:
||: D7#9 F5 E5 :||
In reality, this only makes full sense when seen as TAB. The chord names are simply a guide to the interval content. Find this TAB further down this guitar lesson.
Chorus A
This section contains the song title, so we’ll call it Chorus A.
Once again, we’re dealing with a riff built from individual notes rather than stacked chords. Tom Morello cleverly starts with the same tonal idea as the verse, then alters the ending of each bar by moving through the intervals 6 – b6 – 5.
Because the riff already includes a b7, these 6ths are technically 13 and b13, giving us these wonderfully awkward chord labels:
| D13 D7b13 | D7 (F5 E5) D5 |
| D13 D7b13 | D7 C5 |
Bridge
Next is what can best be described as a bridge. It’s built on D octaves, which technically aren’t power chords (no 5th), so calling it D5 isn’t quite correct—ironically, in what feels like the simplest section so far.
From there, muted strums are added, followed by noise elements and a slide down to end each phrase. This section really only makes sense in TAB; in text, it looks like this:
||: D5 :||
||: D5 (w. mutes) :||
||: D5 (w. mutes + noise) :||
And on we go…
Chorus B
Here, things finally become more straightforward. These are proper power chords:
||: D5 F5 G5 A5 :||
Solo + Outro + End
The solo sits over the same progression as chorus B and really requires a Digitech Whammy pedal to be played authentically.
The outro climbs the D Aeolian scale using 16th-note triplets before returning to the chorus riff.
The ending brings us back to an actual chord—D7#9—before resolving with a final movement:
||: D5 F5 G5 A5 :|| x8
| D5 | E5 | F5 | G5 |
| A5 | Bb5 | C5 | D5 |
||: D5 F5 G5 A5 :|| x8
||: D7#9 :|| x4
| D5 | D5 Eb5 |
If there were ever a case for learning a song through TAB rather than chord shapes, Killing In The Name is it.
Here’s a chord chart—but it only really makes sense once the TAB is in your hands (keep scrolling!).
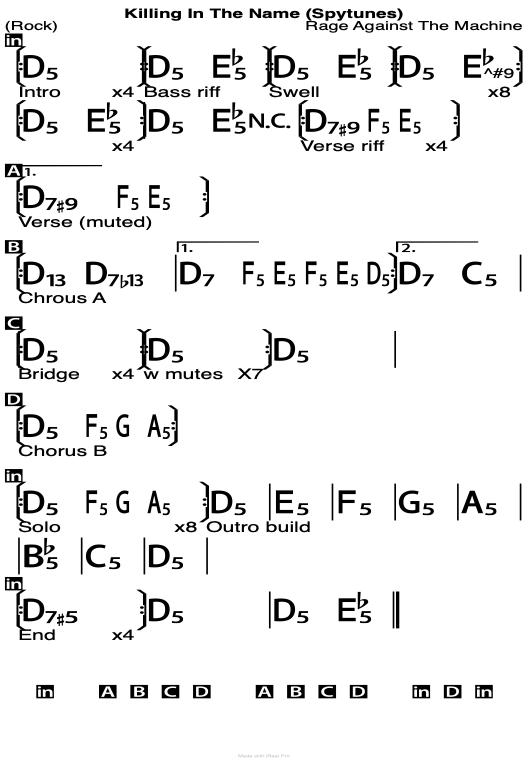
Killing in the Name Chord Chart | PDF + iReal Pro
Download my chord chart as a guide when you practise Killing In The Name‘s riffs, it’ll keep you on track. If you don’t like my layout, use the iReal Pro file to change it:
Killing In The Name | TAB
There’s a lot of TAB to get through here, so any long explanation will only slow things down—let’s dive straight in.
Intro
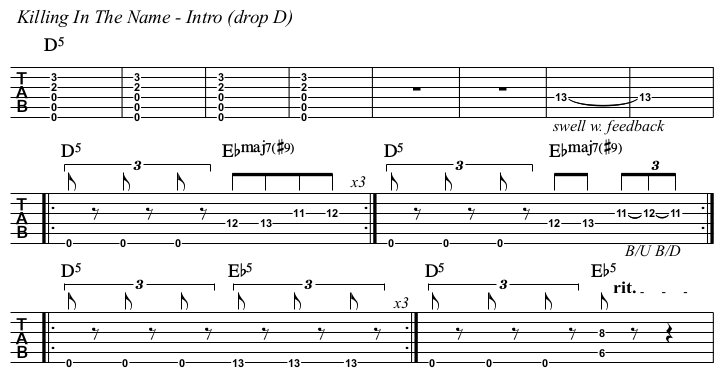
We begin with a huge D5 in drop D tuning. Let it ring, pause, then swell into one of the strangest Eb “chords” you’ll ever play—voiced as single notes. From there, pivot between D and Eb before moving into an unmuted version of the upcoming verse riff.
This TAB takes you right up to that point.
Verse
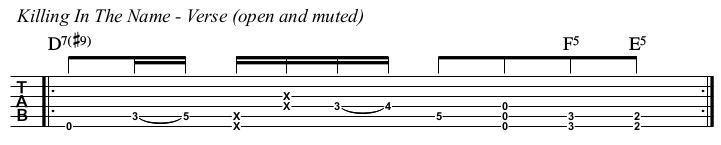
Here’s the verse, which also appears in the intro without palm muting. If you group the notes, you end up with a D7#9.
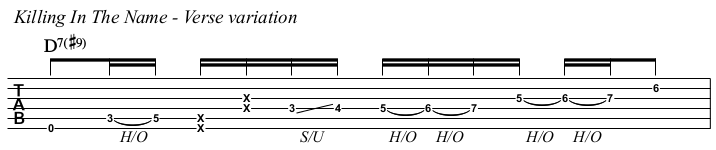
In verse two, a chromatic variation is added:
Chorus
There are two chorus sections—A and B. Here’s chorus A. The chord names may look unusual, but they simply reflect the intervals in the descending line: 6 – b6 – 5.

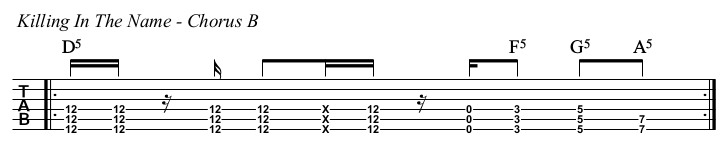
Chorus B (which follows the bridge) is much more straightforward, built entirely from power chords. This is also the progression used for the solo.
Bridge
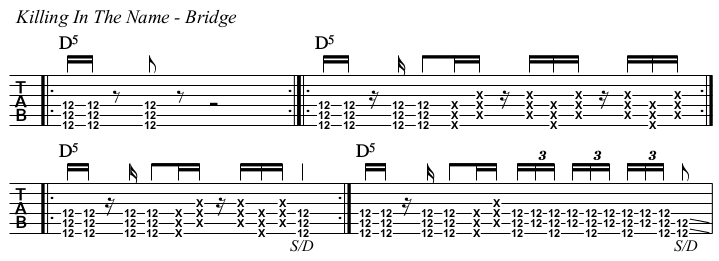
This section genuinely feels like a bridge. We begin with D5, then introduce muted strums to build intensity.
Solo
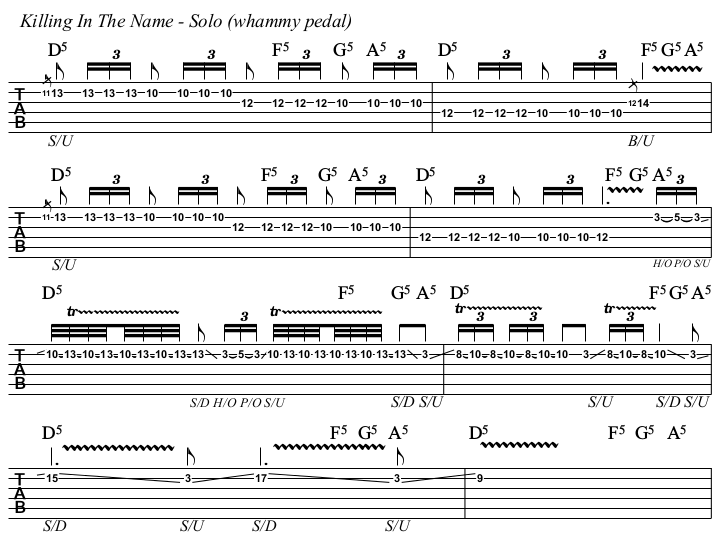
The solo is practically impossible to replicate without a Whammy pedal—it took me a long time to get this one right…
Outro
After the solo, there’s a breakdown leading into a rising build using the D Aeolian scale on a single string.
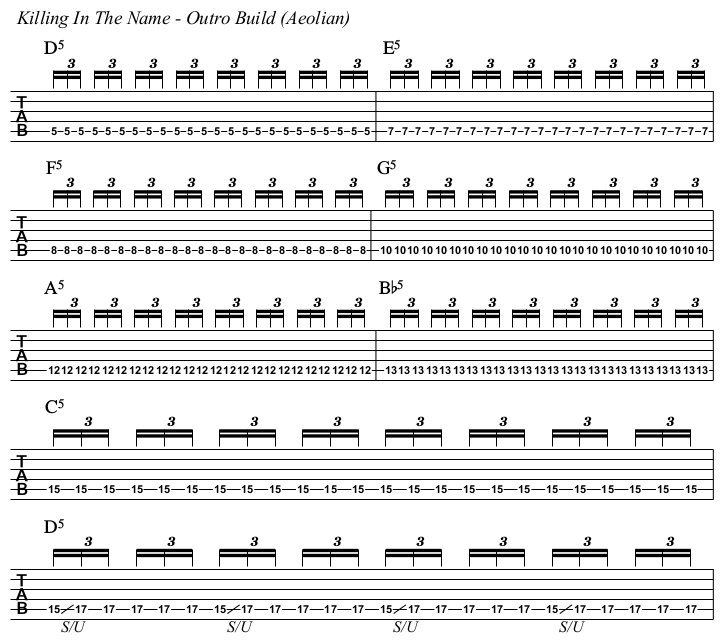
This leads back into the chorus B riff before the final section, which features a proper D7#9 chord.
Once you’ve worked through all this TAB, return to the backing track with a chord chart—you’ll find that D13, D7(b13), and all the other unusual chord names suddenly make perfect sense.
A Protest Song Against the L.A.P.D. and Simon Cowell
Killing In The Name was Rage Against the Machine’s debut single and has since become their signature track.
Tom Morello came up with the drop D riff during a guitar lesson, and by the next day, the band had brought it into rehearsal and completed the song together.
Lyrically, Killing In The Name is a protest against the Los Angeles Police Department, suggesting that some members of the force have ties to the Ku Klux Klan.
Released in 1992 as the first single from their debut album, the track didn’t reach No. 1 in the U.K. until 18 years later. This time, it wasn’t a protest against the LAPD, but against Simon Cowell’s The X Factor.
In a coordinated campaign, fans downloaded the song in 2009 to prevent that year’s X Factor winner from securing the Christmas No. 1 spot.
Killing In The Name Chords: Continue Learning
Step-by-step Guitar Courses

Master guitar by studying real tunes. Build your skills with video lessons, eBooks and practice routines that connect theory with the music you love!
Explore SpyTunes step-by-step Guitar Courses.
Five similar tunes | Chords + Lyrics


